My way of warping a Mirrix Tapestry loom and copper looms
 UPDATED FROM 2014 blog, – The easiest, fastest, foolproof way to warp a Mirrix loom or a copper loom or just about any upright loom with two beams and a tensioning device .

The making of a Kilim-Spinning dyeing and weaving in Anatolia by Janet Willoughby
I first wrote a blog on warping the Mirrix in 2014. The reason-I was spending a tremendous amount of time answering questions from people that were just not able to use the MIRRIX method-which is very much like warping a large Anatolia rug loom, but without the advantage of it laying parallel to the ground and two people passing the warp back and forth. (There is a great video DVD of the processes of weaving in a The Making of a Kilim-Spinning, Dyeing and Weaving in Anatolia by Janet Willoughby that I love to watch.)
The challenges and/ or issues with the process of warping Mirrixes ranged from- Bad shoulders, bad eyesight, directionally challenged-(me and scads of others. If the warping process didn’t get you then the big thick too large silver metal bars did-complicating ones fell line and beginning the tapestry. This method of warping also works well on the ubiquitous copper looms that I thing almost everyone has one or two of. My next blog is on building copper looms.
Since 2014 I have added a couple of refinements for one reason or another that I address as I write about my processes Since then someone has also written a blog on the Mirrix site very much like I warp, but not quite right. So, here’s the written update that I have been promising.
TO BEGIN- Gather your stuff
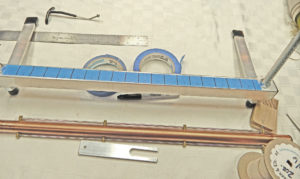
The loom, loom wrench, waterproof marker, blue tape, ruler and warp. Take off heddle bar and save for later-addition.
For the Mirrix-
You will need- the loom-any size, the loom with heddle with heddle bar removed, Mirrix loom wrench, loom cord, indelible marker, ruler, warp, heddles, 3 -1/8th inch and/ or .25 rods-smooth(cut to inside width of the loom minus .5 inches), 2 yoga blocks for upright position(4 if the loom is lain flat to warp) patches or small squares of inter-tubing for tires to use to create ears(explained latter), protractor.
For a copper loom with tensioning device you will need–
You will need-the loom-any size, two wrenches for turning side tensioners, or wing nuts loom wrench, loom cord(ladder cord), indelible marker, ruler, warp, heddles, 3 -.25 inch rods-smooth- cut to inside width of the loom size minus .5 inches, patches or small squares of inter-tubing for tires to use to

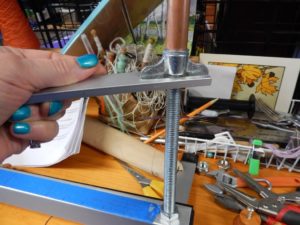
\ Maurine Adrezine with a copper loom on a box easel
To begin-
- Remove heddle bar. The heddle bar is reattached at a later time. Copper looms most often do not use heddle so no bars to remove or heddles to tie.
- You will need to have any side tensioning devices on either loom at their lowest point before you begin to add warp.
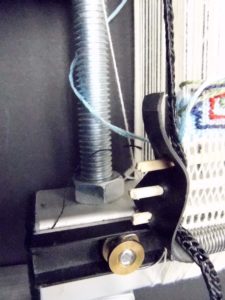
- This is the time to decide how much distance you want to move up the sides with the wing nuts and “all Thread” I usually try to have at least 6 inches of the side screws or “all Thread” showing or none on the Mirrix. This allows me to have a great deal of space to tighten the warps. Set the loom up so there is at least 6 inches of all thread under the wingnuts on the sides.(Inside the copper tube of the Mirrix. On a copper loom check the length of the all thread and have the wing nuts or bolts in the middle of the all thread with the all thread hidden inside the tubing. This is important because you. don’t want to run off the top of the all thread when you tighten or loosen the warps. When building copper looms I like to have the all thread the length of the of the loom for stability and making the loom as large as it can be and more adaptivity to different sizes of tapestries. Measure the distance on the “all thread” to make sure the distance is equal on each side of the loom. This is really important. I also prefer to have the any wings on the nuts facing upward so they don’t catch the warp and other things while I am warping and weaving-especially on my Mirrix and copper looms..
- Make sure that both sides “All Thread” are even. It takes very little difference between the sides to throw off the whole warping and weaving process. If one side is higher the warps will have a tendency to slide to the lower side and be sloppy or uneven in tension. On a copper loom an uneven distance between the two can cause the warps to slip to the lower side over time. Or, if the copper loom is suffering from fatigue the top and bottom beams can lower in the center of the beams and the warps will slide towards the middle as you warp. When you warp on a copper loom is also okay to warp to one side and then even out warps across the loom after you have finished wrapping the warm. Just watch for crossed warps as you warp.
- Place blue tape on the bottom and top bars mark in inch and 1/2 inch increments. It helps if the half inch increment marks are shorter.
- Make sure top marks line up with bottom marks. You can easily tie a string from the
Top beam with tape above the spring.
middle mark on top and the middle mark on the bottom. Measure the angle with a protractor or square for right angle-90 decree angle at top and bottom. Carpenter squares work great. Check your marks against each other the spring spacing can vary depending on it’s age and how much it’s been used.
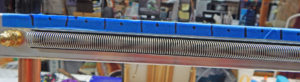
7. Decide on your warp sett. Choose the correct springs and mount them. Leave the bar out of the springs. No worries about this with a copper loom-no spring. Choose the right warp for the right sett. If you are weaving 8 to 12 epi. I would use 12/6 or 12/9 cotton seine twine. You no longer need to buy a whole pound cone-which is a tremendous amount of warp for the smaller looms. Between & Etc now sales warp by the ounce in 8-9 different sizes. I prefer to work at 20-22 epi and use 20/6.
8. Decide the width of the weaving. How many warps will you need. If I am weaving 10 epi I need 10 warps per inch. If the piece is 5 inches wide I will need 10 warps per inch times 5 or 50 warps or wraps around the beams. (I sometimes put two pieces side by side and warp separately when I weave. One of the things I like about this method of warping is I can weave two pieces at once. I will also weave pieces one right after another until I have completely woven all the way around scaffolding between the pieces. Or I will fill the extra space with multiple small sketched tapestries until the space is used up. Usually I only have about 6 inches on a Mirrix left unwoven . I know this is heresy, but I am not fond of warping or the colour yellow so I have a tendency to avoid both whenever possible.)
(There are many factors that determine which warp you want to use-hand of the fabric, density of the fabric, rib structure, unbalancing the weft to warp ration for various reasons. Check out an article I wrote called “The Canons of Warp and Weft Proportion,-The ideal and the slightly fractured. In ATA Tapestry Topics” and a chapter in my So Warped that I wrote with Pat Spark).
When using springs on the larger Mirrix you may want to tie the spring to the beam every 6 inches or so as they have a tendency to pull out of the tray and droop before the spring has the rod through it.
The other trick that I do to preserve the life of the spring and avoid the spacing issue as the springs grow older is to twine right under the springs above the heddles.
9. At this time you can add the bottom spring to your Mirrix if you wish. I don’t affix the spring tray with adhesive to the beam with the glue or sticky stuff, because I usually want to turn the warp and weaving around the beam as I weave or, perhaps use the tray on another loom. By turning the warp and weaving using this method allows me to keep the height of the weaving at the proper height so I don’t injure my shoulders or back over time. I try to keep the weaving and beating surface/ fell line slightly- give or take a bit– at mid chest height. I do always try and attach the bottom spring on the smaller Mirrix’s because I am usually traveling with them and like to collapse them. The bottom spring holds the warps in place and makes it easier to re-tension and maintain warp order on the back of the loom. The problem with this is the springs crush easily when packed which can mess up the spacing and ruins the ability to reuse of the springs easily. You may wish to place blue tape over the springs when you travel to protect them from being crushed ( My Reality and it may not be the same for others–actually—is that I have pretty much stopped using the bottom spring, because it is easier to turn the weaving around the bottom bar without the bottom spring. It just seems to be easier with this method of warping not to have the bottom spring. Having it affixed to the bottom beam limits my options.) I love the bottom springs, but dislike the cost of replacing them if they get bent or spread. So I am using a twining technique more often on the small looms- under the top beam and on top of the bottom rods tied at the exact width the tapestry should be. I can slide the warp into place along and through the twining and I know exactly how wide to make the piece and where to move and space the warps.)
Next step if you haven’t already done this. Works for both Copper looms and Mirrixes
Forget everything you know about using the silver accessory bars supplied by Mirrix as warping accessories to warp around. They are too big to be practical with this method of warping. You can save them for perhaps a very dim and distant future time on another loom or weaving. Notice the size difference of the rods that I use to the Mirrix rods that come with the loom.

Top and bottom Mirrix loom rods, metal rod 1/8th, Bamboo Shiska stake
I have found it’s much more practical and less expensive to go down to a place that sells machine shop stuff, Lowes, or Home Depot, or Harbor Freight and buy the rods and cut them to the right size length for which ever loom I am using. You’ll need 3 cut about .5 inches less then the distance between the two uprights on the loom for easy in turning the warps around the loom. They create your handles for turning the warps around the beams, 3 bars make the warps easier to space and they will eventually give you a staple working fell line to beat against so the fell line won’t shift unevenly as you beat more on one side as I have a tendency to do as I build up in my weaving.
I have seen some very strong people cut them with wire cutters or rod cutters. I am not one of those persons and/or strong enuff so I use a hacksaw or my jewelers saw which is very quick and easy…
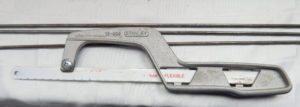
hacksaw blade and rods.
The rods I use are the same size(1/8th inch or .25 inch) as the rods or about the same size rod that goes through the springs on the Mirrix. I often have my students use shiska bamboo stakes for small pieces 4-6 inches-easily cut with scissors or cutting plyers. Any larger they become a little unstable -bending in unwanted places.(Once they are in place I clip the points so they don’t grab or puncture things-myself included. (Any small cutting device or scissors does the job admirably well.) I then add ” ears” so the warps won’t slide off of the rods or shiska stakes.
Now that you have all the stuff ready–
- This first step is optional- but really works well for me. I stand the loom up on to yoga blocks. They have enough space that I can easily circle the bar with the warp spools, ball or cone or tube.
Yoga blocks are helpful to raise the loom high enuff to get a cone or spool of warp under the beam. Also note the beginning knot.
- 2. Remember–We are doing a circular warping pattern not a circle 8 pattern. This means that we are traveling around both top and
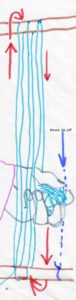
Circular warping pattern. Note the beginning tie on the left in blue you can see the future tie on to end the warping pattern. The first and last warps are not woven on.
bottom beams. Start by tying off the beginning warp at the bottom of the loom on either the right side or left side of the loom. The las t and the first warp on each side will not be woven on. The beginning and ending warps will also have a tendency to hang out in the middle. These two warp allow you to untie or cut and turn the weaving. It’s also the one warp on each size that you might need to lengthen using an over hand knot or a fisherman’s knot around the loom and then retie in the new position when the weaving advanced around the beams. (See Tapestry 101 for the how to illustration for tying these two knots.)There will be an empty warp thread on both sides of the weaving. I try and keep it a little ways away from the warps that are circling around the beams when I warp. These first and last warps warp will not travel through a heddle- They just hang out until needed.
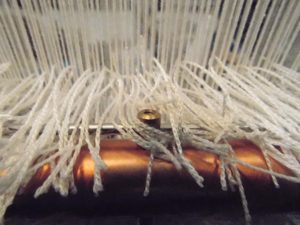
3. Circle around the loom with the warp being careful to place each warp in the proper slot of the spring at the top and the bottom(Bottom spring is optional.) Just be careful if you are not using a bottom spring not to cross the warps as you go around the bottom beam. (if they do cross they are fairly easy to uncross with an awl as long as the top warps are properly in there spring.)
4. Circle the two beams of the loom continually until the allotted width is wrapped or warped. When wrapping try and keep the wraps of warp at a 90m decree angle. The protractor is an easy way of checking the angle that the warps are wrapped
5. Try for an even tension as you wrap. It’s really important when doing the circular warping that you place warps- side by side and don’t cross the warps.6. Tie off warps on bottom beam. That warp and knot also will hang out in the middle of the beam-not even or flat with the rest of the warps. They can be used to check spacing and pull-in or pull out by comparing the distance between the first an last warp and the weaving . (For later-The main importance or job of these two warps is for tying on and off if you are going to weave a larger tapestry that can be
Last warp tied off at the bottom.
pulled around the two bars and the springs as you weave and move around the beams as you go. Being able to move the fell line around the beams allows you to weave on the back and the front and keep the fell line at slightly below the shoulders and above the elbows-breast height. What this means is you’re not stuck with a static fell line, but one that can be moved into better safer-more comfortable positions. The fell line and the tapestry can be lowered and moved around the beam allowing you to weave a greater distance, multiple tapestries and larger pieces on a smaller loom. Now you know the secret of where I learned about knotting.)
6. Now that you have the required amount of warps. Tie off on the bottom beam. This last warp will not be woven on. So move it slightly out of place. It also does not travel through a heddle neither does the first tied on warp. Even if you don’t turn the warp around the beam don’t weave on them since they like to hang out in the middle they can distort or curl the edges of your weaving as they try to escape the weaving in back to being in the middle of the beam if they are woven on or in. If when you turn around the beam those ends become to short you can just tie more warp thread to the ends and finish tying up. A fisherman’s knot is great for this(yep-just like in the boy scout knot manual and PathFinder information.
7. Space the warps a bit. Look for cross overs/twists and fix or move into place. This is really important. It’s better to do the checking now then wait for the tragedy that will eventually happen with cross overs. Check between the layers of weft and at the back top and bottom beams. use an awl or a brassy bob to straighten your warps and correct crossovers-not your finger nails.
8. Tighten up the warp a bit on both sides to begin to tension the warp and also makes it more difficult for the individual warps to move around as you are finishing warping. This is also a good time to put the bars/rods through the springs.
You are now at The point that you can choose the next step You can weave the Mirrix without heddles or with and a copper usually no heddles. You can add the heddle bar, heddles, treadle or hand switch or Spencer at this time. If your not using heddles go to the next section and weave in the rods.
- Cut your heddles and have them ready to add.
- Put the rods through the springs at the top and the bottom to hold the warps in order. The bottom spring is optional, but if your using it place the rod through
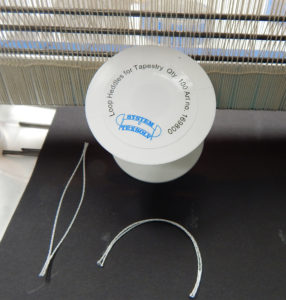
Heddles come on a spool. Heddles are uncut , 100 on a spool cut through the small slit not the long slit.
that spring also.
- Weave a rod over and under through the warps so that it is easier to see and pick up the warps in the correct order. shove it up evenly close to the top of the loom, but under where the heddles will go around the warps. This also gives you something to use to check the order of the warps at the top spring. It will be pulled out once the heddles are on. Or, at the bottom edge of the loom weave in the 3 metal rods below where heddles will be added to the rod. Either way works.
Now that you have warped the loom in a circular fashion, it is the time to put the heddle bar in place.
- Attach the heddle bar. I lower the heddle bar so I can add the heddles sitting down at a comfortable level. Make sure both the heddle bars can be turned so that the heddle rods will be at the top and bottom of the bar. Occasionally, with the rod in if not perfectly centered a tiny bit of the bar will peak out on one side of the rod anchors and can keep the bar from turning. So check it out and if necessary re-center the rod so it’s out way of the way and where it belongs.
Check and reset the end of the heddle rod if it doesn’t turn.
Important- The heddle bar that the heddles attach too should be at the top and the bottom-not in the middle. They ill be parallel to the floor and the ceiling. Also make sure the metal things or disks are turned to anchor the heddle bar in place so they won’t let the bar come loose as you manipulate the heddles.
uncut Texsolv heddles
Important-I do not tie my own heddles. I am one of those persons who can never consistently tie square or granny knots. If tied improperly the heddles will snow down on you when you begin to weave and the knot unties-not a good thing. I like to use Texsolv heddles. Betweenandetc.com sells them for 20.00 per hundred. Texsolv heddles for tapestry\ looms have 100 heddles to a spool. The are reusable. The heddles come uncut and wrapped around a spool. There are two slits- a small one and a large one that are 3 inches and half an inch. Cut through the small slit in half on both ends of the large slit and you have heddles ready to use.
Texsolv heddles saves a lot of time, energy and tears. Unless, of course you are one of Gods gifted- I am not- and can always be consistent. Then, feel free to take the time to create a jig and tie the heddles. If you wish to tie your own heddles create a jig to tie them on– Use a foot or less of a two by four or one by one. Use finishing nails with out a head driven solidly into the wood at a 90 decree angle and are driven a good .5 inches. Be careful the nails are at 90 decree angles and don’t lean towards each other as you tie the heddles. The two nails will have a tendency to lean towards the center of the jig and become smaller or shorter.Use a good cord such as cotton seine twine 12/6 or 9 for tying the heddles. To me the extra the one time cost is well worth the saved time and effort of tying the heddles. I have never worn out a heddle or replaced n all of the hours which are hundreds that I have woven with them.
2. Heddles should be folded in half, partially encircle not completely circle every other warp and both end loops should be pierced by the heddle rod. It’s nice to get the ends of the heddles close to the rod and not toward the center. Then later you don’t have to worry about those ends of the heddles tangling with warp or their being too near their brethren warps and not shedding properly.
3. Carefully, place heddles on every other warp on the top rod. . Double check constantly. One off and the rest are going to be off and twisting in to the wrong sheds when you try to use them. When you get to the middle be very careful about where half is. Make sure the heddles will pull at a 90 decree angle-continue until
crossed heddles over support. Need be at 9o degrees and not crossing supports.

Proper alignment of heddles and support
complete. Watch the rod supports when putting the warps on making sure that that the heddles on both bars do not pull at an angle. This is where a really common error occurs and can really narrow the sheds-reducing them to nothing. Be very careful that the rod doesn’t go past the hole in the end rod support that is screwed down with the hex wrench and catch on the heddle bar holder when turned. . Tighten all the end screws with the hex wrench.
4. A really common error occurs and can really narrow the sheds-reducing them to nothing. Be very careful that the rod doesn’t go past the hole and catch on the heddle bar brace when turned. Tighten all the end screws with the hex wrench. Note the difference in the two photos. You shouldn’t be able to see the rod end.
5. Do the bottom row of heddles. Be very careful that you’re doing the other half of the warps and every other warp. This Only one warp thread allowed per heddle. Again, when you reach the middle make sure the heddles split on the half way mark at a 90-degree angle. This might be a good time to see if half way is matching up on both bars. There is a very good reason for this. You don’t want to create a gap in the heddles in the middle or have the heddles pulling across other heddles when you shift the shed. That little doohickey in the middle that the rod goes through can split the wefts and warps apart creating crossed heddles between the two sets of heddles or pull them in such a way to create a gap between warps as you weave.
6. Remove the woven in metal rod. It’s job is done.
7. Optional-Twine across the warp from side to side right under the spring, but above the heddles. Tie off at the correct width of the spring. This helps keepe the spring from stretching out of place over time. it’s especially helpful to keep the spring from distorting over time. When you do turn the warp around the beam it is easy just to

Top twining that can be pulled around as you turn the warps around to a new position. It’s the thin white line under the spring.
beat up against the twining and reposition it against the bottom of the spring tray.
8. And to repeat-again! Be careful where the rod begins and ends when you tighten the hex bolt. This is where a very common error occurs and can really narrow the sheds. Be very careful that the rod doesn’t go past the hole and catch on the heddle brace when turned. Tighten all the end screws with the hex wrench.
9. Another easy fix. On some of the older larger mirrix loom- my Zeus- the distance was too great between the supports that the rods went through. So on really tight warps the rods would pull out of shape and become difficult to get a healthy shed. The fix is very easy- Purchase some nuts that fit on the rod that are the exact size of the distance between the rod and heddle bar. They will act as an extra support for the bar.
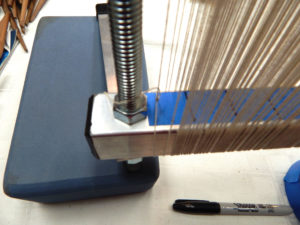
10. Tighten the warp if the tension of the warps feels or looks uneven or loose in any where. tighten the loom as tight as you can using the Mirrix wrench. Don’t worry you won’t be weaving this tight. Walk away from the loom and leave it sitting overnight. Come back and it should be tensioned evenly. Back the tension off until it’s not so tight, but weavable. Cautionary notes when you do this. Make sure you tighten the wing nuts on the side the same distance use a ruler to
Using the mirrix wrench
measure the distance between the wing nuts or large nuts that may be on the copper looms. Please use the Mirrix wrench on the Mirrix loom. It saves the wrist and fingers. (Yeah, that funny looking flat thing with the slot that comes with the loom is an incredible wrench.) On a copper loom use two wrenches- One to hold one but or wing nut from turning as you turn with the other wrench. After a few hours or better 24. One of the biggest mistakes with the Mirrix is that without having a tight warp the shed will be smaller. So, check the tightness of the warp if your shed isn’t as large as you would like it to be. When thinking about sheds and the Mirrix or any loom realize that a shed is a suggestion of how large it could be if used properly. The hand goes into the shed and turns to make a larger shed. Check out my u-tube videos on the Care and feeding of bobbins.
Ready to weave and set the warp spacing!
Forget everything you know about using the silver accessory bars supplied by Mirrix as warping accessories to warp around or begin or. They are too big to be practical with this method of warping. You can save them for perhaps a very dim and distant future time on another loom. Notice the size difference of the
as the rods that go through the springs on the Mirrix springs. I often or have my students use shiska bamboo stakes. (once they are in place I clip the points so they don’t grab or puncture things-myself included. Any small cutting device or scissors does the job admirably well.)
- Add the switch handle for changing the sheds and or the treadles. You can now use them to change the sheds.
- If you haven’t already weave in the 3 metal rods. Check for any warping errors and correct. Pull the bars down as far and as close together as possible. Make any corrections necessary.
- Cut the and add the ladder cords to each side of the warp. Betweenandetc.com sales the ladder cord by the inch. The cords are reusable and at this point in time come in black and white. We may add several more colours over time. Use twice the length of the loom if you are turning the warp and tapestry around the beam as you weave. If you are not turning the cord should be the height of the loom plus 6 inches. Loop the cord around the top beam and run the end of the cord through one through a hole in the ladder cord. Pull tight.
- The ladder cords will hold the bars in place and create a cradle to hold the metal rod ends on each side of the warp.
Place each rod end through a hole in the ladder cord. Do this on each side Make sure the rods are horizontally level. Now you will have a fell line that can be beaten on and it will stay level and not sink on either side. I haven’t done this on one of the wider Mirrixes yet, but those rods will probably need to be larger rod and then rods because of the distance across the warp. To turn the warp around the loom loosen the warp and weaving tension and use the rods as handles to turn. - Okay, it’s time to create the ears that I have mentioned a few times. This is such a handy thing that Roy Gonna Bitsòò Kady a friend and well known tapestry weaver taught me. I asked for a name and he said they were “ears”. Ears are created by cutting squares or rectangles from old rubber tire tubing. The rods or just
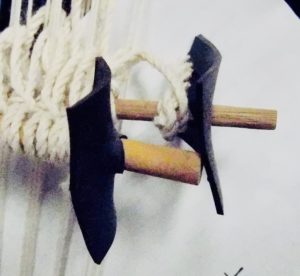
Ears protecting heddles from sliding off the rod-Navajo loom
about anything can be forced to pierce the tubing and they act as stops to anything that might fall off the end of the rod. I like to do a rectangle of the rubber tubing that can hold all 3 of the rods.. That way there is less areas for warp and weft to tangle around. I do this on both sides of the rods. Thank you Roy!
Ears piercing the rods in the background you can see the warp that is not woven on. It’s been pulled off location so it can be photographed.
6. Cut a warp 3 times the width of the loom or weaving area. Larks head to the second warp on each side ignoring the warp that is hanging out in the middle on each side or the ones that will not be woven on. At exactly the width of the weaving tie a knot. Do this even if it is to wide or too small. You should know before starting how many warps there are to an inch and how wide the piece will be. So if a piece is 10 inches wide and you are working at 10 epi you have 100 warps.
7. Now space the warps with a proper pointy tool into the proper position. The twining and knot will keep the proper width and the warps can be manipulated into place if necessary as you space the warps. (You are less likely to need to much spacing if you use a bottom spring. My bottom springs are not glued to the Mirrix frame but tied in place so I can shift them around the bar as I turn the piece.)
8. If tension feels uneven or even if it doesn’t over tighten the warp tighter then you can
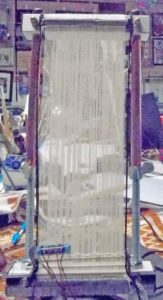
The loom set up and ready to weave.
possibly weave. Open first shed and place weft in open shed. Close Shed. Change shed and weave across-Do this 3 times to partially begin to keep and space warps in place.There will be some spring up for about a half inch of weaving up-note center of weaving. Start the serious weaving of the selvedge.
Reminder- Beat well and evenly all the way across the weaving area.
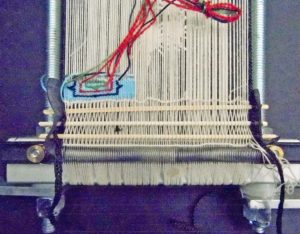
Detail of loom set up warped loom,-with 3 rods, ears, twining.
Reminder-Make sure you tighten the wing nuts on the side the same distance.
Reminder-Check to make sure everything is square and equal. Same distance on both sides between the top and bottom cross beams.
Reminder– The warp should sound like a musical instrument and not displace when strummed. Generally, the tighter the warp the easier it is to weave with fewer problems.
Sew on your cartoon and weave!
It would be so great to have a video of you warping your Mirrix! Just sayin’!
I really dislike teaching on the web. I don’t think I am a great teacher when I do web stuff. I am a very good teacher with hands on in real time. Web teaching isn’t for everyone. I am also dyslexic so it makes my dyslexia worse when I teach on the web. I prefer things that are written and working directly with people. So guess you’ll have to take a class, or a private study with me to actually see it done. Or you could join the Tapestry Compendium or My small format a place of our own on facebook.
Hi Kathe, fabulous tutorial on circular warping – timely too as I’ll be warping a Mirrix this week.
I have a question about the ladder cords. If I understand correctly each cord is 2x the length of loom, one each side of loom. Each rod inside a hole . To turn warp around bottom beam , loosen tension and pull down . If I loop the cord around the top beam how is the warp going to move? I just can’t for the life of me visualize this.
Thanks
YOu have to take the ladder cord off each side and the but it back on. Either from the front or the back depending on the position of the weaving. Thanks for pointing that out. I need to add that as a correction to the blog.
Aha , Thanks Kathe!